
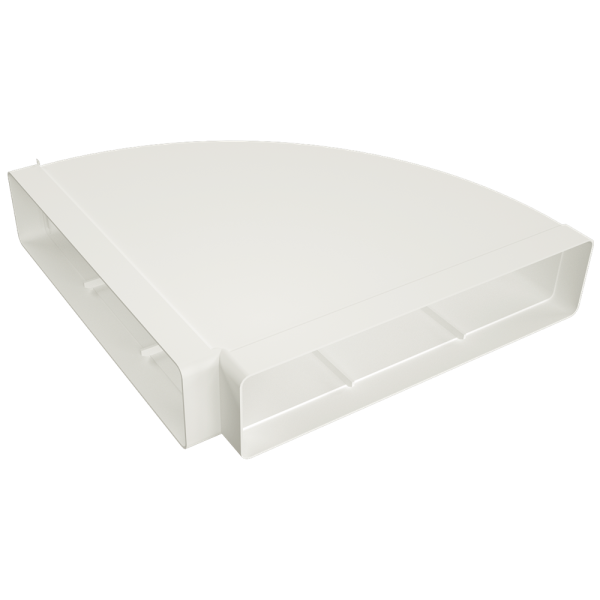

204×60 90 Degree Horizontal Bend
Presenting the 204×60 90 Degree Even Twist, a great ventilation extra intended to give simple and effective establishment to your ventilation framework. This flat twist is ideally suited for use in homes, business structures, or modern settings, conveying solid and effective air quality and ventilation.
With its 204mm x 60mm aspects and 90-degree point, this even twist is viable with different ventilation frameworks and conduits. Its sturdy development and consumption safe materials guarantee enduring execution and bother free support.
Simple to introduce, this even twist gives a dependable and effective association between conduits, considering ideal wind current and ventilation. Its smooth plan and low-profile development make it ideal for use in any climate, including living spaces, workplaces, or modern settings.
Whether you’re an expert project worker or a Do-It-Yourself devotee, the 204×60 90 Degree Even Curve is a flexible and solid answer for your ventilation needs. Overhaul your ventilation framework today with this top-quality even curve.
- Description
Description
Mastering the Art of 204×60 90 Degree Horizontal Bend: A Comprehensive Guide
If you’re looking to become a master at 204×60 90 degree horizontal bend, you’ve come to the right place. This comprehensive guide will take you through everything you need to know to perfect this technique. Whether you’re a beginner or an experienced welder, mastering this bend requires precision, finesse, and attention to detail. But fear not, with the right tools and guidance, you can achieve a flawless bend every time. We’ll cover everything from choosing the right equipment and materials, to preparing your workpiece, and executing the bend itself. Along the way, we’ll share expert tips and tricks to help you avoid common mistakes and achieve professional results. So, let’s dive in and start honing your skills in the art of 204×60 90 degree horizontal bend.
Understanding the Mechanics of the Bend
Before we dive into the specifics of the bend, let’s take a moment to understand the mechanics behind it. The 204×60 90 degree horizontal bend is a technique used in welding to create a sharp, angled bend in a pipe or tube. This type of bend is often used in plumbing and HVAC systems to route pipes around corners and obstacles.
To create this bend, you’ll need to use a pipe bender. A pipe bender is a tool that clamps onto the pipe and uses hydraulic pressure to bend it to the desired angle. The bender is typically fitted with a set of dies that are shaped to match the diameter of the pipe and the angle of the bend.
Tools Needed for the Job
To achieve a perfect 204×60 90 degree horizontal bend, you’ll need to have the right tools on hand. Here’s a list of the essential tools you’ll need:
– Pipe bender: As mentioned, a pipe bender is essential for creating this type of bend. Make sure to choose a bender that is compatible with the size and type of pipe you’ll be working with.
– Pipe cutter: Before you can bend the pipe, you’ll need to cut it to the correct length. A pipe cutter is a specialized tool designed to cut through pipe cleanly and quickly.
– Deburring tool: After cutting the pipe, you’ll need to remove any rough edges or burrs from the cut end. A deburring tool is a hand-held tool that shaves off any rough edges and ensures a smooth surface for bending.
– Safety gear: Whenever you’re working with tools and machinery, it’s important to take safety precautions. Make sure to wear safety glasses, gloves, and protective clothing to prevent injury.
Safety Precautions to Take
As with any welding project, safety should be your top priority when working on a 204×60 90 degree horizontal bend. Here are some key safety precautions to keep in mind:
– Wear protective gear: As mentioned, make sure to wear safety glasses, gloves, and protective clothing to prevent injury.
– Use a well-ventilated area: Welding creates fumes that can be hazardous if inhaled. Make sure to work in a well-ventilated area or use a fume extractor to remove harmful particles from the air.
– Keep the workspace clean: Clutter and debris can create tripping hazards and increase the risk of injury. Keep your workspace clean and organized to prevent accidents.
– Follow instructions carefully: Always follow the manufacturer’s instructions when using equipment and tools. Improper use can lead to injury or damage to the equipment.
Preparing the Pipe for Bending
Before you can begin the bending process, you’ll need to prepare the pipe for bending. Here’s how to do it:
– Cut the pipe to the correct length: Use a pipe cutter to cut the pipe to the correct length. Make sure to measure carefully to ensure an accurate cut.
– Deburr the cut end: Use a deburring tool to shave off any rough edges or burrs from the cut end of the pipe. This will ensure a smooth surface for bending.
– Lubricate the pipe: Apply a lubricant to the surface of the pipe. This will help the pipe slide smoothly through the bender and prevent it from getting stuck or damaged.
Mastering the Art of 204×60 90 Degree Horizontal Bend: A Comprehensive Guide
If you’re looking to become a master at 204×60 90 degree horizontal bend, you’ve come to the right place. This comprehensive guide will take you through everything you need to know to perfect this technique. Whether you’re a beginner or an experienced welder, mastering this bend requires precision, finesse, and attention to detail. But fear not, with the right tools and guidance, you can achieve a flawless bend every time. We’ll cover everything from choosing the right equipment and materials, to preparing your workpiece, and executing the bend itself. Along the way, we’ll share expert tips and tricks to help you avoid common mistakes and achieve professional results. So, let’s dive in and start honing your skills in the art of 204×60 90 degree horizontal bend.
Understanding the Mechanics of the Bend
Before we dive into the specifics of the bend, let’s take a moment to understand the mechanics behind it. The 204×60 90 degree horizontal bend is a technique used in welding to create a sharp, angled bend in a pipe or tube. This type of bend is often used in plumbing and HVAC systems to route pipes around corners and obstacles.
To create this bend, you’ll need to use a pipe bender. A pipe bender is a tool that clamps onto the pipe and uses hydraulic pressure to bend it to the desired angle. The bender is typically fitted with a set of dies that are shaped to match the diameter of the pipe and the angle of the bend.
Bending the Pipe
Now that the pipe is prepared, it’s time to begin the bending process. Here’s how to do it:
1. Choose the correct dies: Select the dies that match the diameter of the pipe and the angle of the bend you want to create.
2. Position the pipe in the bender: Place the pipe into the bender, making sure that it is aligned with the dies.
3. Begin bending: Use the hydraulic pump on the bender to begin bending the pipe. Move the lever slowly and steadily to create a smooth bend. Be sure to keep an eye on the angle of the bend to ensure that it matches your desired angle.
4. Check the angle: Once the bend is complete, use a protractor or angle finder to check the angle of the bend. If it’s not quite right, you may need to make minor adjustments to the bend.
Checking the Bend for Accuracy
After creating the bend, it’s important to check it for accuracy. Here’s how to do it:
– Use a protractor or angle finder to check the angle of the bend. If it’s not quite right, you may need to make minor adjustments to the bend.
– Check for cracks or deformities in the pipe. If you notice any defects, you may need to start over with a new piece of pipe.
Fixing Any Mistakes in the Bend
If you notice any mistakes or defects in the bend, don’t panic. Here are some tips for fixing common issues:
– Overbend: If you overbend the pipe, you can try to correct it by using a hydraulic jack to push the pipe back into place.
– Underbend: If you underbend the pipe, you can try to correct it by using a hydraulic jack to push the pipe further into the bender.
– Cracks or deformities: If you notice cracks or deformities in the pipe, you may need to start over with a new piece of pipe.
Finishing the Job
Once you’re satisfied with the bend, it’s time to finish the job. Here’s how to do it:
– Remove the pipe from the bender.
– Use a pipe cutter to trim any excess length from the ends of the pipe.
– Deburr the cut ends of the pipe to ensure a smooth surface.
– Inspect the pipe for any defects or issues.
Troubleshooting Common Issues
Here are some common issues you may encounter when working on a 204×60 90 degree horizontal bend, along with tips for troubleshooting them:
– Pipe getting stuck in the bender: If the pipe gets stuck in the bender, try lubricating it with a spray lubricant or applying some WD-40 to the surface of the pipe.
– Uneven bend: If the bend is uneven, you may need to adjust the dies or the position of the pipe in the bender.
– Cracking or deformities: If you notice cracks or deformities in the pipe, you may need to start over with a new piece of pipe.
Tips for Achieving the Perfect Bend
Here are some expert tips and tricks for achieving a flawless 204×60 90 degree horizontal bend:
– Take your time: Don’t rush the process. Move the lever on the bender slowly and steadily to create a smooth bend.
– Use a lubricant: Applying a lubricant to the surface of the pipe will help it slide smoothly through the bender and prevent it from getting stuck or damaged.
– Measure carefully: Accurate measurements are key to achieving a perfect bend. Take your time to measure the length and angle of the bend carefully.
– Practice, practice, practice: Like any skill, mastering the art of 204×60 90 degree horizontal bend takes practice. Keep at it, and you’ll soon be able to achieve professional results.
Conclusion
Mastering the art of 204×60 90 degree horizontal bend requires precision, finesse, and attention to detail. By following the steps outlined in this guide and taking the time to practice, you can achieve a flawless bend every time. Remember to take safety precautions, choose the right tools and materials, and follow the manufacturer’s instructions carefully. With these tips and tricks, you’ll be well on your way to becoming a master at this essential welding technique.


